Saturday, November 19, 2011

Year in Review and a QK giveaway

It's been a fun year creating our calendar pages each month. With the pages complete, you'll need a first page for your album so that the two pages per month face each other in the album. 
Although this page uses some specific dies, they can be adjusted to what you have on hand. Giveaway details at the end of the post.

First, reflect on your photos taken this year and select 5-7 photos that you can crop to 2" square. Cut them to size and ink the edges with a black cat's eye. 

Die cut the months border die (or die cut individual letters to create a month border) from the cream cardstock. Cut 12 -2" square pieces from the cream cardstock. Adhere to page as shown.
Die cut the year numbers from the cream card stock. Use the font you have, it will be okay. I slipped a snowflake under the 0 and then attached it with a brad, adhering the 0 on top with mini glue dots. Three white brads are placed before the numbers to the left.

Then choose from the "leftovers" from the year, elements that will work with your photos.  Your techniques and elements will probably vary from that which I used. I added numbers to some of the birthday photos, buttons to the square with the fall leaf, and created a fall wreath using a 2" wreath die as the background with flower soft in two color ways glued to the wreath form. I looped a ribbon through the top and adhered it all to a square.
See the individual pictures for details and ideas.

Supplies I used:
Black and cream designer cardstock.
Black soot Tim Holtz distress ink pad
We r Memory Keepers paper piercing tool, piercing mat
Penny Black let is snow round stamp
Stampabilities O Holy night stamp
 Martha Stewart snowflake punch
Flower soft spring and russet red and flower soft glue
one white prima flower
assorted buttons 
2 tiny white brads one larger flower center brad
Dk brown embroidery floss

Dies:
QK 4" assorted leaf die
QK 12" months border die
QK 2" wreath die
Number dies of choice


Up for grabs: one 4" QK Holly die


you must have a die cut machine to use this die
 
Leave a comment, be a follower. One entry for leaving a comment, one for being a follower. Please leave a separate comment for each. And for those who repost on FB or your blog, another entry via another comment that contains the link.  This drawing is open to shipping addresses in the US only. The winner will be chosen by random number generator at noon November 26th.  Good luck to all! It's been a blessed year.

Friday, November 11, 2011

December Calendar page

Supplies:
Red Calendar page
Red Calendar companion page
Assorted Christmas Papers as shown
Black ink pad: cat's eye and regular ink pad
Stamps: Stampabilities Merry Christmas; 
Recollections - hanging ornament as shown
Stampin Up - May the miracle
Unknown maker - pinecone and holly and holly stamps
Stickles: Xmas red,Platinum, Gold, Lime Green
Copic markers - R08 vermillion, G28 Ocean Green
Brown watercolor pencil and brush
Corner Rounder
Red and white twine by farmer's market
Assorted ribbons
snowflake, tree and bell buttons
Gold leafing pen
Pop dots, glue dots and adhesives

Dies:
QK curly twig - companion page
QK 2" round and elongated ornament dies
QK 4" ornament die with both round and elongated
Cottage Cutz Elegant Christmas tree - or tree of choice
Spellbinders sled die

Stamp all images as shown. Color in the stamped ornaments with the red copic marker.
Loosely color in all ivy leaves with the green copic marker.
Die cut the ornaments, December, sled, tree as shown or as desired using a variety of papers.
Pop the large ornaments when they are attached.
adhere ribbon as hangers and bows using glue dots.

Die cut the branch out of black cardstock. The all black photo placeholders are 4 1/4 x 6 1/4"

Gold leaf the ornament hangers, the sled runners, and the star on top of the tree.

The 25th has the "may the miracle" stamped onto a pale paper, trimmed and corners rounded. Mount on slightly larger place cardstock. Trim corners. Punch hole in center top, tie a ribbon through hole. #25 was a found sticker.

Packages are cut to random sizes and tied with twine or ribbon. Insert into sled. Attach buttons with pop dots. Depending on your button type, it might be necessary to remove the shank with a pair of side cutters or nippers.

Color in the pinecones with the brown water color pencil. Paint over the top of your coloring with a damp paint brush to spread the color and lighten it. 

"Stickle" the holly dots on the ornaments and the holly stamped images. The plaid ornament has the green dots stickled on the green cross hatch. The red colored ornaments have been stickled on all dots with the green. 


Stay tuned for a QK die giveaway right after Thanksgivings, when the scrapbook opening page will be posted.

Saturday, October 22, 2011

November Calendar


Supplies:
Brown calendar page
fall leaves designer paper
cornucopia designer paper
scrap cardstock
green, black cardstock
Twine
Tim Holtz Tiny Attacher
Give Thanks (Stampin Up Holiday Best) and Happy Thanksgivings (Stampendous) stamps
Black Ink pad
Spellbinders graduated pumpkin dies
Quickutz Calendar dies - November
Cottage Cutz Pumpkin Patch die set (pumpkin leaves)
Copic Markers - E29 Burnt Umber; Y17 Golden Yellow
EK Success Corner punch
24 gauge gold wire
Wire cutters
Shish-kabob stick
Recollections Holly Leaves (Michaels) in fall coloration with gold glitter edge


Stamp Give thanks in upper left of calendar, leaving room for a leaf in the curve of the corner.

Attach twine with Tiny Attacher, use a glue dot to attach the bow. Stamp Happy Thankgiving as shown. Place a sticker on Thanksgivings Day.

  • Trim a center square from the green cardstock leaving a 1" edge on the green cardstock. You are cutting a large square out of the green cardstock. The 12" square should be a frame of 1" width. You will have a 10" square of green left with with to create the elements for the companion page.
  • Die cut 2 large, 2 medium and 1 smallest pumpkin (use the 3 smallest sizes) out of the fall leaves two sided paper. The stripe is the other side of the leaves. Color the stems of each pumpkin with the brown Copic. 
  • Die cut a second set of pumpkins out of scrap cardstock. These are to back the designer paper as it is quite thin and would be very floppy supported on pop dots.
  • Twist the gold wire around the shish-kabob stick creating a coil. Clip with wire cutters.
  • Adhere a scrap pumpkin to a designer paper pumpkin wedging a coil in between the two papers. 
  • Cut 2 pieces of green cardstock (from the 10" square) 4 1/2 x 6 1/2". Cut 4 small green leaves from the Pumpkin Patch die set. Attach two to the pumpkins on the calendar page as shown.
  • Trim 1/8" from each edge of the cornucopia designer paper. Back with a sheet of black cardstock.
  • Cut two pieces of black cardstock 4 1/4" x 6 1/4". 
  • Use the corner punch on the previously cut green mats.
  • Insert the black card stock into the openings left by the corner punch in the green mats.
  • Attach both mats to the page as shown. Do not adhere the lower left mat to the right upper one where they overlap or else you won't be able to get a photo into the top one.
  • Attach two pumpkins with pop dots as shown. Both pumpkins have one leaf each and a gold wire curly.
  • Attach 3 leaves as shown.

Thursday, October 20, 2011

A little delay...

Sorry about the delay getting the November calendar pages up. I have them done, but since my computer has had technical difficulties and is being cared about by the nicest tech guy, I am at his mercy as to when I get the pictures loaded.. need to have the laptop back! Patience sweet readers... they will appear shortly..

Wednesday, September 7, 2011

September QK Club

September Companion Page:
Brown, black, yellow and green carstock

Companion cardstock to calendar page
Twine
Tim Holtz Tiny Attacher
Assorted Buttons
orange polka dot ribbon
Brown white mini check ribbon
Pop cots
Vintage Photo Tim Holtz distressing ink with dauber
QK Leaf dies as shown

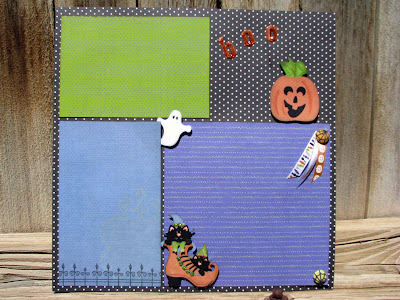
October Calendar and Companion Page
Black dot and companion calendar papers
Little Yellow Bicycle papers as shown (blue, purple, green, orange)
assorted Halloween ribbons
4 spider web brads
Black cat's eye ink pad
Black Versafine Onyx Black inkpad
White signo uniball pen
Black memento dual marker
Black Pop dots
Green and orange copic markers (or markers of choice)
Shamrock green flower soft and flower soft glue
Glitter glue: orange, lime green and purple
Halloween stamps: spiders web and Halloween

QK dies:
October
Haunted alphabet font
2" spider
2" ghost
2" jack-o-lantern

Cottage Cutz dies:
scaredy cat mini
sppky fence
Build-a-Jack
Kitties in boot

You must bring your own glitter glues, inks and markers. The stamps I'm using are clear stamps and to protect the stamp I ask that you only use the Versafine Ink pad. Please do not use another ink pad type. This layout will also lend itself beautifully to only pumpkins or any other theme you would like..

See you Saturday, September 10, 2011 at 10am!!We have a lot to accomplish so please be timely. Also, please bring a print out of the pages with you so you will be able to complete assembling the die cuts.

Wednesday, August 17, 2011

August QuicKutz Club

August Companion Page:

1 sheet green cardstock
1 sheet yellow cardstock

1 black cardstock
1 companion paper to calendar sheet
4" Lemon/lime QK die
2" bee (QK) die

2" photo corners (QK) die (earlier club die)
1 yard clear w/ black elastic ribbon (DML)
1 yd tiny green rick rack (DML)
Black tear embellishment (DML)
Tim Holtz Mini-attacher
Glossy Accents (used as an adhesive)
1 sheet Lace paper - (I have a bit I can share)

1 dots EKSuccess edging punch
1 lattice Martha Stewart Edging Punch
Inks - you must bring your own!
Color box - black
Color box - amber clay


 September Calendar Page:

2 sheets green cardstock
2 sheets brown cardstock
companion paper to calendar
QK: calendar die set
QK: mini maple leaves collection die - came in a set?
QK: 4" combination fall leaves die
Assorted buttons: orange, yellow, ochre, black, green
1 yard brown check ribbon
1 yard orange with white polka dot ribbon
24" twine 
Tim Holtz Mini-attacher
1/2 and 1/8" glue dots
Tim Holtz Vintage Photo stamp pad
Tim Holtz sponge dauber


See you Saturday.. Can't wait for cooler weather! Can you?

Wednesday, July 13, 2011

QuicKutz club July

July companion page:


Red bandana print paper (1) DML

dk blue , red and white cardstock (DML)

Black cardstock (DML)

Swirly stamps

Versamark embossing stamp pad (DML) - You must bring your own stamp pad!

Zing embossing powder in silver glitter finish; rouge opage finish and blue metallic finish (DML)

Embossing heat tool

pop dots

silver ink pad

black in pad

glue dots or adhesive of choice

red and white stripe ribbon
2" die with 3 stars 5- screw top brads in silver finish (DML)


August Calendar Page:

2 sheets green cardstock
1 sheet yellow cardstock
4" Lemon/lime QK die
2" bee (QK) die
Calendar die set - August
1
yard clear w/ black elastic ribbon (DML)
1 yd tiny green rick rack (DML)
Black tear embellishment (DML)
Tim Holtz Mini-attacher
Glossy Accents (used as an adhesive)
1 sheet vellum
1 sheet Lace paper - (I have a bit I can share)
corner flower stamp

Inks - you must bring your own!
Color box - olive
Color box - black
Color bok - amber clay
Memento - Tuxedo Black


How is your album coming along? Are the pages in an album? Are there pictures on the pages? Any journaling? We are now officially in the second half of the year, time has really gone by quickly hasn't it?
See you Saturday July 16th at 10am!

Friday, June 17, 2011

June QK Club

June Companion page:

black cardstock
Margarita designer paper in turq with lime, wide stripe and narrow stripe, flowers
lime green crepe paper
black outlining pen
4 large margarita brads
QK dies:
3 border dies as shown (the flower is from the long strip of flowers border die)
4" Dolls die


July Calendar Page:
Red bandana print paper (2) (DML)
dk blue , red and white cardstock (DML)
Black cardstock (DML)
Swirly stamps
Versamark embossing stamp pad (DML)
Zing embossing powder in silver  glitter finish; rouge opage finish and blue metallic finish (DML)
Embossing heat tool
Smash red and white paper clips
pop dots
silver ink pad
black in pad
glue dots or adhesive of choice
red and white stripe ribbon
STudio Classic #4 die
2" Medallion die (club die)
2" die with 3 stars
2" stars embossing folder and embossing cutting pad
Mini-attacher


*Sorry can't get on the QK website without logging in, can't remember how i logged in and they can't either!)

Thursday, May 19, 2011

May QK Club

May Companion Page:
Bring cardstock from May calendar page
Super tape – DML
Black ink pad
2 green and 1 blender copics OR green scraps
3 pink brads
Black and white mini check ribbon
Black cat’s eye ink pad
Flower soft (variegated coloration of your choice)
Flower soft green
Flower soft adhesive
Flower soft stems
Wire cuttersQK 4" Bluebonnet die
QK 2" grass die
QK 2" posie die set


June Calendar Page
June calendar
black cardstock
Margarita designer paper in turq with lime, wide stripe and narrow stripe
lime green crepe paper
black outlining pen
4 large margarita brads
QK dies:
June Calendar die
3 border dies as shown (the flower is from the long strip of flowers border die)

*Sorry can't get on the QK website without logging in, can't remember how i logged in and they can't either!)


See you Saturday at 10am!


Wednesday, May 11, 2011

Fun with Watercolor pencils!

Found this cool video this morning in my inbox! Yes, I get updates from Hero Arts. Take a look and see what you can do with those pencils you bought but are sitting a drawer!  If you want to see more of their cool stuff - then just click HERE.


Friday, April 15, 2011

April companion page May Calendar QK Club


Supplies for April companion page:
coordinating cardstock
yellow dot and black cardstock
4 yellow brads
1 black brad
yellow dot ribbon
black and white mini check ribbon
brad setting tools
pop dots
black cat's eye ink pad
QK 4" Umbrella die
QK 2" rain drops die
Copic paper & markers (same as you used in March!)


Green cardstock (2)
April calendar page - Candy
1 blue cardstock
1 light blue cardstock
1 yellow cardstock
Super tape – DML
Black ink pad
2 green and 1 blender copics OR green scraps
3 pink brads
Black and white mini check ribbon
Black cat’s eye ink pad
Flower soft (variegated coloration of your choice)
Flower soft green
Flower soft adhesive
Flower soft stems
Wire cutters
QK 4" Bluebonnet die
QK 2" grass die
QK 2" posie die set


See you Saturday morning!

Tuesday, March 15, 2011

April Calendar and March Companion Page Club pages

March Companion Page Supply List:
a second companion paper to calendar -Leafy green/dk green grid (DML)
black cardstock
strips and journaling bubbles - Green Day by Reminisce (DML)
multi green brad assortment (DML)
black mini brads
black rick-rack (DML)
Dk green cat's eye ink pad
black cat's eye ink pad
QK dies: horseshoe, shamrock,
Tim Holtz mini-attacher
Brad setting tools.

April Calendar Page:
April Calendar
Yellow dots cardstock
black cardstock
yellow polka dot ribbon
4 1/4" brads
Black cats eye ink
Copic Paper
Copic BG13 Mint Green
Copic BG32 Aqua Mint
Copic 0 Colorless blender
Brown colored pencil
QuicKutz/Lifestyles dies:
RS150 raindrops
REV 0181 S rain puddle
REV SK-0006 Summer Fun/Splish Splash
Tim Holtz Tiny Attacher

Wednesday, February 16, 2011

February QuicKutz club

 Supply List: February companion page:
QK heart cookie cutter die
Martha Stewart heart border punch
pink and black mini check ribbon (DML)
1 white decorative paper cardstock (it's embossed and sooo cool) (DML)
Black ink pad (cat's eye and preferably used one not brand new)
x-acto blade and cutting mat
metal edge ruler
Sew Easy tool with cross stitch runner and cushioned mat
pink floss
darning needle


Supply List: March Calendar page:
a second companion paper to calendar -Leafy green/dk green grid (DML)
black cardstock (1 full + smaller scraps)
strips and journaling bubbles - Green Day by Reminisce (DML)
multi green brad assortment (DML)
black mini brads
1 yd black rick-rack (DML)
Dk green cat's eye ink pad
black cat's eye ink pad
Stickles lime green glitter glue (please bring your own supply)
QK dies: mini shamrocks; horseshoe, shamrock, calendar die cut set
Tim Holtz mini-attacher
Gold leaf pen
Brad setting tools.

See y'all Saturday morning at 10!